LUCES ASX

seven

Moderador
Miembro del equipo
Última edición:

Tonix

Forero Experto
Hola a todos.
Mi experiencia con led H11 no fue buena, un alcance mucho menor que la halógena.
Al mes las quité y volví a lo bueno conocido, Osram Cool blue intense H11.
Luz muy blanca y alcance brutal.
Sigo entrando por aquí de vez en cuando...saludos a los nuevos y a los veteranos.
 

seven

Moderador
Miembro del equipo
Hola a todos.
Mi experiencia con led H11 no fue buena, un alcance mucho menor que la halógena.
Al mes las quité y volví a lo bueno conocido, Osram Cool blue intense H11.
Luz muy blanca y alcance brutal.
Sigo entrando por aquí de vez en cuando...saludos a los nuevos y a los veteranos.
gracias por el consejo, mis halogenas cada dia alumbran menos, o a mi me lo parece.
Un placer tenerte de vuelta, saludos!!!!!
 

DoCa

Nuevo Forero
Hola, a primeros de diciembre compré mis primeras bombillas led h11 4300k, y la verdad, el cambio me ha impresionado mucho. Dan una luz muy agradable y bonita, al menos para mí.

El corte es perfecto, aunque he bajado al nivel 1 la ruedecilla de las luces, porque parecían que estaban un pelín altas.

Ahora se nota la iluminación incluso con el alumbrado público, más luz en los laterales y cuando te cruzas con cualquier coche "moderno", parecen que ellos lleven leds de primera generación.

Hasta hoy siguen funcionando, es cierto que no conduzco mucho de noche. Eso sí, estoy un poco mosca sobre volver a las halógenas en verano, porque viviendo al lao de Sevilla, súmale tú la alta temperatura ambiente a la de las bombillas.

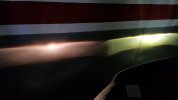
Halógeno izquierda y led derecha.

20240203_162303.jpg


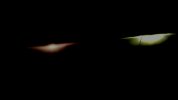
Y esta le he bajado la exposición para apreciar mejor el patrón.

Patron de luz.jpg
 
Última edición:

seven

Moderador
Miembro del equipo
Hola, a primeros de diciembre compré mis primeras bombillas led h11 4300k, y la verdad, el cambio me ha impresionado mucho. Dan una luz muy agradable y bonita, al menos para mí.

El corte es perfecto, aunque he bajado al nivel 1 la ruedecilla de las luces, porque parecían que estaban un pelín altas.

Ahora se nota la iluminación incluso con el alumbrado público, más luz en los laterales y cuando te cruzas con cualquier coche "moderno", parecen que ellos lleven leds de primera generación.

Hasta hoy siguen funcionando, es cierto que no conduzco mucho de noche. Eso sí, estoy un poco mosca sobre volver a las halógenas en verano, porque viviendo al lao de Sevilla, súmale tú la alta temperatura ambiente a la de las bombillas.
las bombillas led se calientan diez veces menos que las halogenas, yo en la moto que tenia antes cambie de halogenas a led y no se calentaban nada de nada, nunca pasaron de 38ºC, medido con termometro infrarrojo
 

DoCa

Nuevo Forero
las bombillas led se calientan diez veces menos que las halogenas, yo en la moto que tenia antes cambie de halogenas a led y no se calentaban nada de nada, nunca pasaron de 38ºC, medido con termometro infrarrojo
Que se calientan menos es cierto.

Pero, ¿tipo de led, qué potencia, sistema de enfriamiento, tiempo de uso, temperatura ambiente? Muchas equis en el aire.

Es como si le digo que mi gpu no excede de los 25°C en una habitación a 40°C. ¿Qué está sucediendo para que esto sea así?

No es lo mismo un led dip que un mt-g2.

Decir, que las bombillas que he comprado, pueden hacerte quemaduras de primer grado, y a mis manos pongo por testigo.
 

Russibic

Forero Experto
Que se calientan menos es cierto.

Pero, ¿tipo de led, qué potencia, sistema de enfriamiento, tiempo de uso, temperatura ambiente? Muchas equis en el aire.

Es como si le digo que mi gpu no excede de los 25°C en una habitación a 40°C. ¿Qué está sucediendo para que esto sea así?

No es lo mismo un led dip que un mt-g2.

Decir, que las bombillas que he comprado, pueden hacerte quemaduras de primer grado, y a mis manos pongo por testigo.
Pues muy bien, lo cambiaste y disfrutas del cambio)
p.s. Tanto os gusta desafiar el universo, echar un pulso a las estrellas...
Ahora comprendo, lo del regateo con el torro))))))))))))))
Luz led, en los faros no homologados, es algo que hace bien para el conductor, pero jode mucho a los que te lo ven en carretera)
No todos los faros, mejor dicho el "cristal" es adecuado, para la luz led.
Fria, caliente, cachonda o soza)) En fin, cualquier cambio, si viene para bien, esta acceptado.
 

Fher

Forero Activo
Pues muy bien, lo cambiaste y disfrutas del cambio)
p.s. Tanto os gusta desafiar el universo, echar un pulso a las estrellas...
Ahora comprendo, lo del regateo con el torro))))))))))))))
Luz led, en los faros no homologados, es algo que hace bien para el conductor, pero jode mucho a los que te lo ven en carretera)
No todos los faros, mejor dicho el "cristal" es adecuado, para la luz led.
Fria, caliente, cachonda o soza)) En fin, cualquier cambio, si viene para bien, esta acceptado.
Pues yo no entiendo vuestra manía de salir con el torso desnudo a jugar con un oso en la nieve
 

Russibic

Forero Experto
Pues yo no entiendo vuestra manía de salir con el torso desnudo a jugar con un oso en la nieve
Es otra cosa parecida.))))))
La umanidad, tiene muchas formas culturales, de autodestruirse)))
 

seven

Moderador
Miembro del equipo
yo hablo del calor del led desde el bulbo a las aletas disipadoras, yo en mi moto llevaba foco led integrado, es decir no es bombilla led, es un foco con 4 lentes led.
En una moto, las luces delanteras están siempre encendidas en cuanto giras la llave, fuí a pasar la ITV y por supuesto, me las rechazaron, como ya lo esperaba, llevaba el foco y bombilla original en el baul trasero, asi que en el parking de la ITV cambié el foco led (que llevaba encendido más de 1 hora) con las manos y no estaba ni templado, puse el original, que es halogeno, pase la ITV de nuevo, me la aprobaron y otra vez en el mismo parking al salir, volví a poner el foco led, y esta vez, al quitar la bombilla halogena, tuve que usar guantes y no pude tocar el bulbo, porque su temperatura era superior a 200ºC, ya que mi termometro de infrarrojos daba exceso de temperatura, superaba esos 200ºC que es su temperatura maxima de marcado.

por eso digo que el led no se calienta como una halogena.

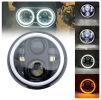
por otro lado, tanto la ertzaina como la GC me han parado varias veces con ese foco led y lo unico que me han dicho es: que focos más chulos traen las motos modernas. Este es el foco del que hablo
1707074795854.png
 

seven

Moderador
Miembro del equipo
por cierto, es el "mismo" que llevaba el mini de Carlos Sainz en el Dakar 2021
1707075056493.png
 

Juanchoo

Forero Experto
Dejo info sobre cómo sustituir luces en el Mitsubishi ASX:


Replacement of lamp bulbs​


Before replacing a bulb, ensure the lamp is off. Do not touch the glass part of the new bulb with your bare fingers; the skin oil left on the glass will evaporate when the bulb gets hot and the vapour will condense on the reflector and dim the surface.

• Bulbs are extremely hot immediately after being turned off.
CAUTION

• Bulbs are extremely hot immediately after being turned off.


When replacing a bulb, wait for it to cool sufficiently before touching it. You could otherwise be burnt.

• If you are unsure of how to carry out the work as required, we recommend you
NOTE


• If you are unsure of how to carry out the work as required, we recommend you to consult a specialist.

• Be careful not to scratch the vehicle body when removing a lamp or lens.

• When it rains or when the vehicle has been washed, the inside of the lens sometimes becomes foggy. This is the same phenomenon as when window glass mists up on a humid day, and does not indicate a functional problem.

When the lamp is switched on, the heat will remove the fog. However, if water gathers inside the lamp, we recommend you to have the lamp checked.

Bulb capacity

When replacing a bulb, use a new bulb with the same wattage and colour.

Outside

1- Front turn-signal lamps: 21 W (WY21W)


1- Front turn-signal lamps: 21 W (WY21W)
2- Headlamps, high-beam: 60 W (HB3)

3- Type 1

Front fog lamps: 35 W (H8)

Daytime running lamps: 13 W (P13W)

Type 2

Daytime running lamps: 13 W (P13W)

Type 3

Front fog lamps: 55 W (H11)

4- Headlamps, low beam

Halogen: 55 W (H11)

High intensity discharge*2: 35 W

5- Position lamps: 5 W (W5W)
6- Side turn-signal lamps (on fender)*1,*2: 5 W
7- Side turn-signal lamps (on outside rear-view mirror)*1

*1: if so equipped
*2: Have the lamps bulbs replaced at a MITSUBISHI MOTORS Authorized Service Point.

Codes in parentheses indicate bulb types.

• Always consult a specialist when repairing or replacing the bulbs of high
WARNING

• Always consult a specialist when repairing or replacing the bulbs of high intensity discharge headlamps.


This is because the power circuit, bulbs and electrodes generate a high voltage that could cause an electric shock.

• An LED, not a bulb, is used in the side turnsignal lamp (on outside rear-view
NOTE


• An LED, not a bulb, is used in the side turnsignal lamp (on outside rear-view mirror).

Contact a MITSUBISHI MOTORS Authorized Service Point when there is a need for repair or replacement.

• For the side turn-signal lamp (on fender), it is not possible to repair or replace just the bulb.

Contact a MITSUBISHI MOTORS Authorized Service Point when there is a need for repair or replacement.

8- High-mounted stop lamp


8- High-mounted stop lamp
9- Licence plate lamps: 5 W (W5W)
10- Rear fog lamp: 21 W (W21W)
11- Reversing lamps: 16 W (W16W)
12- Rear turn-signal lamps: 21 W (W21W)
13- Stop and tail lamps

Codes in parentheses indicate bulb types.

• An LED, not a bulb, is used in the stop lamp/ tail lamp and high-mounted stop
NOTE


• An LED, not a bulb, is used in the stop lamp/ tail lamp and high-mounted stop lamp. Contact a MITSUBISHI MOTORS Authorized Service Point when there is a need for repair or replacement.

Inside

1- Room lamp (rear)*: 8 W


1- Room lamp (rear)*: 8 W
2- Vanity mirror lamps*: 3 W
3- Room lamp (front) & map lamps: 8 W
4- Luggage room lamp: 5 W
5- Glove box lamp: 1.4 W

*: if so equipped

Headlamps (low beam, except for vehicles with high intensity discharge headlamps)

1. When replacing the bulb on the left side of the vehicle in the case of diesel-powered vehicles, remove the bolt (A) holding down the relay box and move the relay box towards the rear of the vehicle.

2. When replacing the bulb on the right side of the vehicle in the case of diesel-powered


2. When replacing the bulb on the right side of the vehicle in the case of diesel-powered vehicles, remove the bolts (B) holding down the reservoir tank and move the reservoir tank.

3. When replacing the bulb on the right side of the vehicle in the case of diesel-powered


3. When replacing the bulb on the right side of the vehicle in the case of diesel-powered vehicles, remove the clips (C) by prying with a straight blade (or minus) screwdriver, and remove the side cover.

4. Turn the cap (D) anticlockwise to remove it.


4. Turn the cap (D) anticlockwise to remove it.

5. Turn the bulb (E) anticlockwise to remove it.


5. Turn the bulb (E) anticlockwise to remove it.

6. While holding down the tab (F), pull out the socket (G).


6. While holding down the tab (F), pull out the socket (G).

7. To install the bulb, perform the removal steps in reverse.


7. To install the bulb, perform the removal steps in reverse.

• Handle halogen lamp bulbs with care.
CAUTION

• Handle halogen lamp bulbs with care.


The gas inside halogen lamp bulbs is highly pressurized, so dropping, knocking, or scratching a halogen lamp bulb can cause it to shatter.
• Never hold the halogen lamp bulb with a bare hand, dirty glove, etc.
The oil from your hand could cause the bulb to break the next time the headlamps are operated.

If the glass surface is dirty, it must be cleaned with alcohol, paint thinner, etc., and refit it after drying it thoroughly.


Headlamps (low beam, for vehicles with high intensity discharge headlamps)


Headlamps (low beam, for vehicles with high intensity discharge headlamps)

Do not attempt to disassemble or repair headlamps, and do not attempt to replace their bulbs.

• A high voltage is present in the power circuit and in the bulbs and bulb
WARNING

• A high voltage is present in the power circuit and in the bulbs and bulb terminals.


To avoid the risk of an electric shock, contact a MITSUBISHI MOTORS Authorized Service Point whenever repair or replacement is necessary.
 

Juanchoo

Forero Experto
Headlamps (High-beam)
1. When replacing the bulb on the left side of the vehicle in the case of diesel-powered vehicles, remove the bolt (A) holding down the relay box and move the relay box towards the rear of the vehicle.
2. Turn the cap (B) anticlockwise to remove it.

2. Turn the cap (B) anticlockwise to remove it.
3. Turn the bulb (C) anticlockwise to remove it.

3. Turn the bulb (C) anticlockwise to remove it.
4. While holding down the tab (D), pull out the socket (E).

4. While holding down the tab (D), pull out the socket (E).
5. To install the bulb, perform the removal steps in reverse.

5. To install the bulb, perform the removal steps in reverse.
• Handle halogen lamp bulbs with care.
CAUTION
• Handle halogen lamp bulbs with care.

The gas inside halogen lamp bulbs is highly pressurized, so dropping, knocking, or scratching a halogen lamp bulb can cause it to shatter.
• Never hold the halogen lamp bulb with a bare hand, dirty glove, etc.
The oil from your hand could cause the bulb to break the next time the headlamps are operated.

If the glass surface is dirty, it must be cleaned with alcohol, paint thinner, etc., and refit it after drying it thoroughly.

Position lamps
 

Juanchoo

Forero Experto
Position lamps

1. When replacing the bulb on the left side of the vehicle in the case of diesel-powered vehicles, remove the bolt (A) holding down the relay box and move the relay box towards the rear of the vehicle.

2. When replacing the bulb on the right side of the vehicle in the case of diesel-powered


2. When replacing the bulb on the right side of the vehicle in the case of diesel-powered vehicles, remove the bolts (B) holding down the reservoir tank and move the reservoir tank.

3. When replacing the bulb on the right side of the vehicle in the case of diesel-powered


3. When replacing the bulb on the right side of the vehicle in the case of diesel-powered vehicles, remove the clips (C) by prying with a straight blade (or minus) screwdriver, and remove the side cover.

4. Turn the socket (D) anticlockwise to remove it.


4. Turn the socket (D) anticlockwise to remove it.

5. Pull the bulb out of the socket.


5. Pull the bulb out of the socket.

6. To install the bulb, perform the removal steps in reverse.


6. To install the bulb, perform the removal steps in reverse.
 

Juanchoo

Forero Experto
Front turn-signal lamps

To remove


1. Remove the upper cover.

For information regarding how to remove the upper cover, refer to “Removing and installing the upper cover and duct”.

2. Remove the entire socket and bulb assembly (A) by turning it anticlockwise.

3. Remove the bulb by pulling it out.


3. Remove the bulb by pulling it out.

To install


To install

1. To install the bulb, perform the removal steps in reverse.
2. Install the upper cover.

For information regarding how to install the upper cover, refer to “Removing and installing the upper cover and duct”.

Side turn-signal lamps (on fender)*

• For the side turn-signal lamps (on fender), it is not possible to repair or
NOTE


• For the side turn-signal lamps (on fender), it is not possible to repair or replace just the bulb.
• Contact a MITSUBISHI MOTORS Authorized Service Point when there is a need for repair or replacement.

Side turn-signal lamps (on outside rearview mirror)*

• An LED, not a bulb, is used in the side turnsignal lamps (on outside rear-view
NOTE


• An LED, not a bulb, is used in the side turnsignal lamps (on outside rear-view mirror).

Contact a MITSUBISHI MOTORS Authorized Service Point when there is a need for repair or replacement.
 

Juanchoo

Forero Experto
Front fog lamps

1. Pull the lamp cover (A) to the direction of the arrow to remove it.

2. Remove the screws (B), and then remove the lamp unit.


2. Remove the screws (B), and then remove the lamp unit.

NOTE


• Except for vehicles equipped with daytime running lamps, when unfastening the
NOTE


• Except for vehicles equipped with daytime running lamps, when unfastening the screws, be careful not to move the beam position adjustment screw (C).

3. While holding down the tab (D), pull out the socket (E).


3. While holding down the tab (D), pull out the socket (E).

4. Turn the bulb (F) anticlockwise to remove it.


4. Turn the bulb (F) anticlockwise to remove it.

5. To install the bulb, perform the removal steps in reverse.


5. To install the bulb, perform the removal steps in reverse.

• Handle halogen lamp bulbs with care.
CAUTION

• Handle halogen lamp bulbs with care.


The gas inside halogen lamp bulbs is highly pressurized, so dropping, knocking, or scratching a halogen lamp bulb can cause it to shatter.
• Never hold the halogen lamp bulb with a bare hand, dirty glove, etc.
The oil from your hand could cause the bulb to break the next time the fog lamps are operated.

If the glass surface is dirty, it must be cleaned with alcohol, paint thinner, etc., and refit it after drying it thoroughly.


Daytime running lamps
 

Juanchoo

Forero Experto
Daytime running lamps

1. Pull the lamp cover (A) to the direction of the arrow to remove it.

2. Remove the screws (B), and then remove the lamp unit.


2. Remove the screws (B), and then remove the lamp unit.

3. Turn the bulb (C) anticlockwise to remove it.


3. Turn the bulb (C) anticlockwise to remove it.

4. While holding down the tab (D), pull out the socket (E).


4. While holding down the tab (D), pull out the socket (E).

5. To install the bulb, perform the removal steps in reverse.


5. To install the bulb, perform the removal steps in reverse.

Rear fog lamp

1. When removing the lamp unit (A), push it towards the left side of the vehicle body.

2. Remove the socket (B) and bulb assembly by turning it anticlockwise.


2. Remove the socket (B) and bulb assembly by turning it anticlockwise.

3. Remove the bulb by pulling it out.


3. Remove the bulb by pulling it out.

4. To install the bulb, perform the removal steps in reverse.


4. To install the bulb, perform the removal steps in reverse.

• If the wiring harness is pulled off the 2 harness guides on the lamp unit while
NOTE


• If the wiring harness is pulled off the 2 harness guides on the lamp unit while replacing the bulb, make sure to secure the wiring harness to the harness guides.

• When installing the lamp unit, first insert the tab (C) into the groove (D) on the body, and then push on the lamp unit to fit it into place.

Rear combination lamps
 
Arriba
"